Creating my 10k Apart entry
The Challenge
The rules for 10K Apart are (taken from their site):
- Size — Your total initial download cant be over 10kB. You can lazy-load additional resources, but your project must be usable in 10kB or less. Scrutinize your projects performance.
- Interoperability — Your project must work equally well in all modern browsers. We may look at it in Lynx too. Or Opera Mini. Your code should have standards.
- Accessibility — Everybody should be able to use your awesome creation. Interaction methods, screen sizes, contrast, assistive technologies… its all about creating opportunity. Embrace inclusive design.
- Progressive Enhancement - The Web is a messy place and you never know what technologies will be available in your users devices and browsers. Build in layers.
- Libraries — This time around, we want you to account for every bit of code you use, so you can use a library or parts of one, but it counts against your 10k if you load it by default. Use only what you need.
The Concept
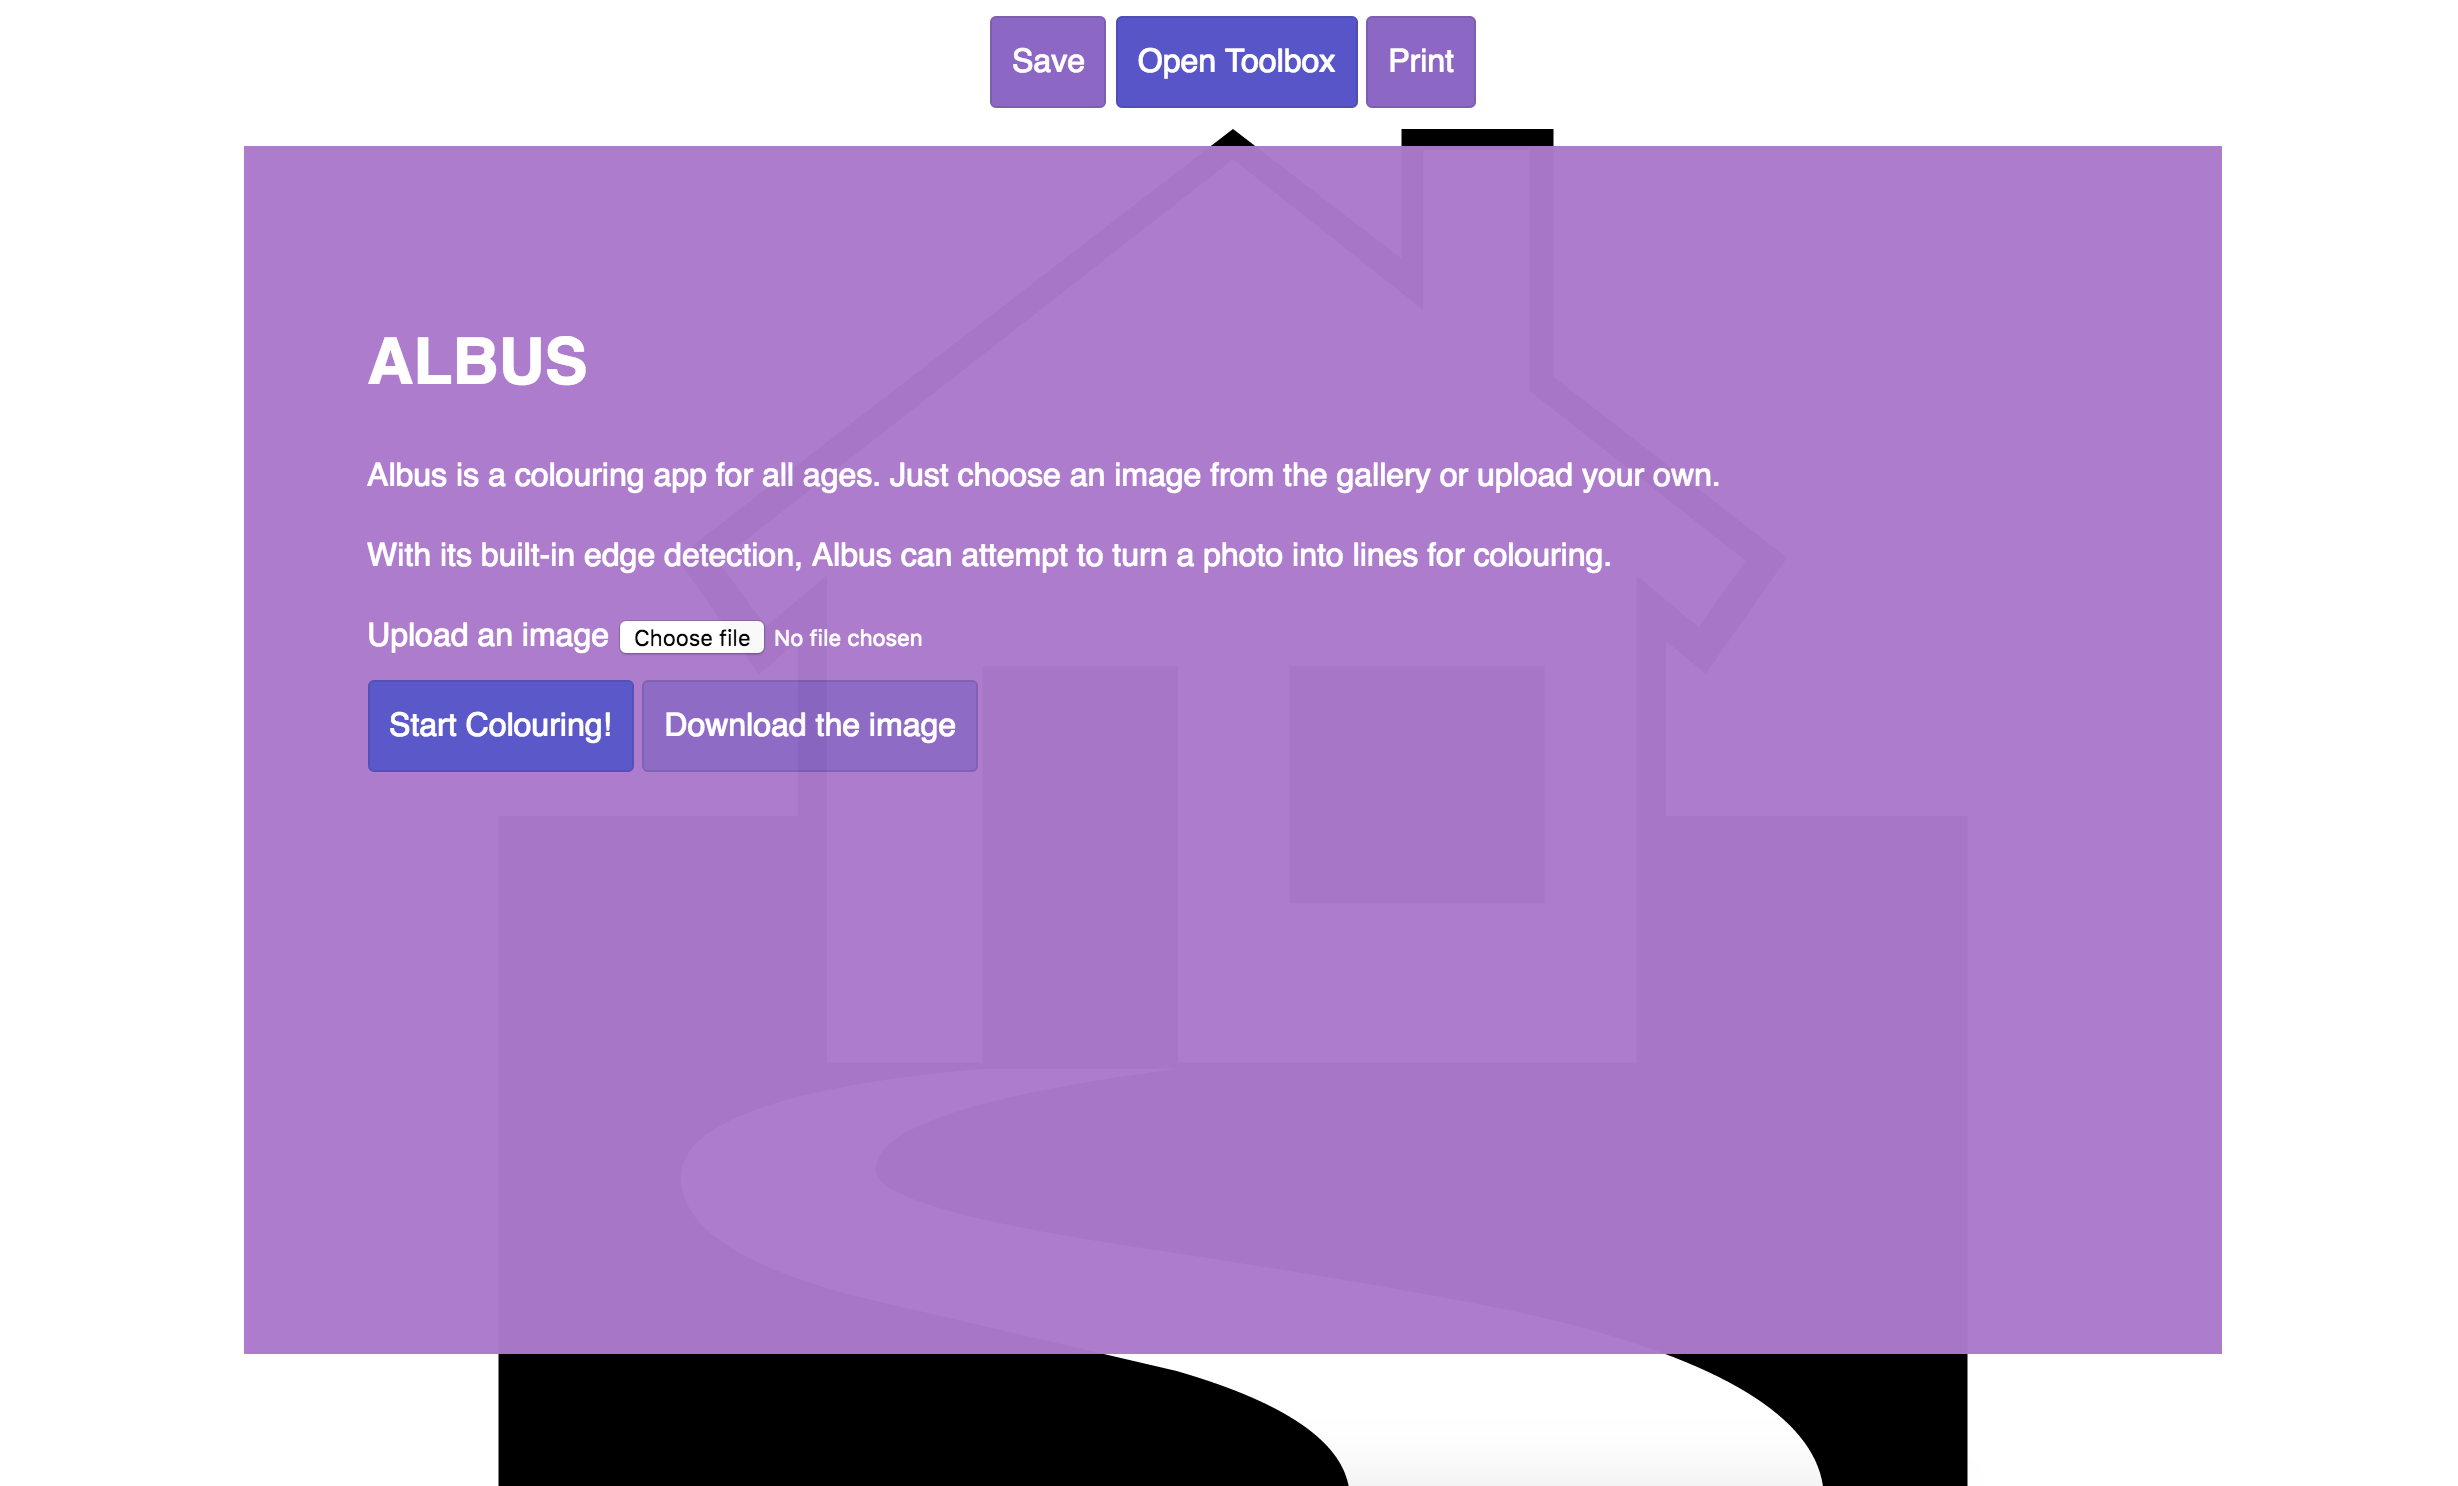
Call me crazy, but for this progressive enhancement focussed competition I decided to create a canvas web app called Albus. Obviously, it doesnt make much sense to create a drawing app for something that requires an experience that works without JavaScript. However, progressive enhancement to me means you build upon the minimum viable product—the baseline—to enhance with features for the browsers that support them.
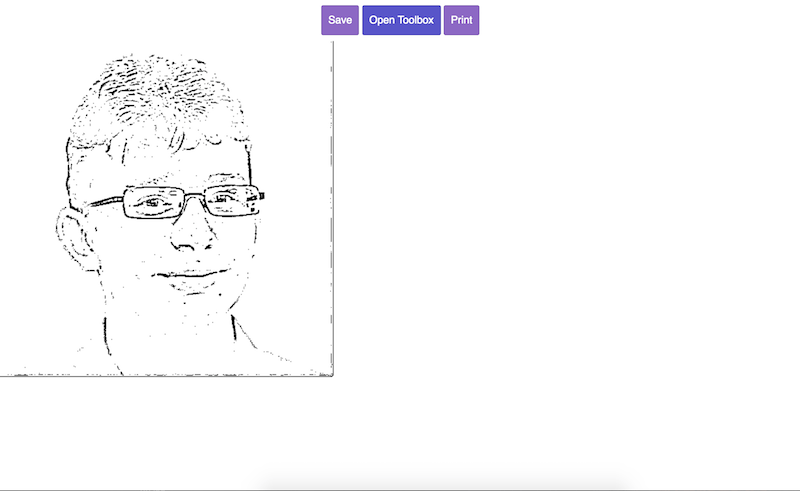
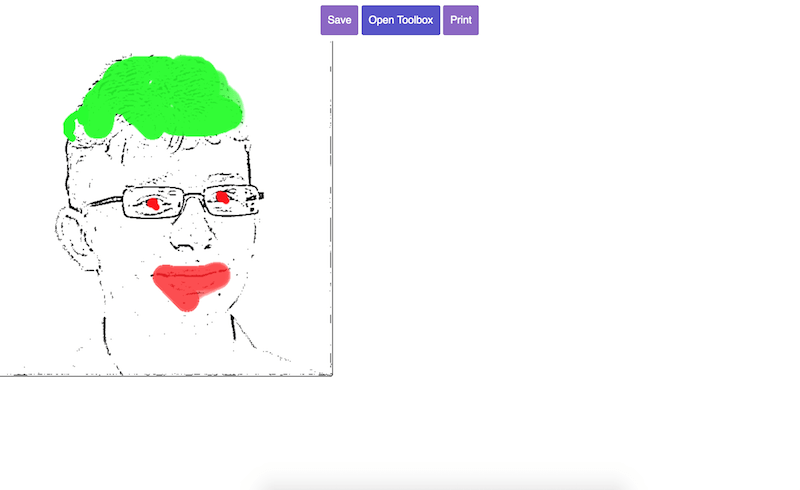
So while on most modern browsers you will be able to draw on the canvas, the actual concept is a website that generates line art from a photo.
The baseline requirement is that you must be able to put in a photo and it will return line art. The browsers that dont support canvas, or JavaScript is unavailble, will use server-side generation while other browsers will be able to use service workers and generate it locally while offline. That, in my humble opinion, is how progressive enhancement should work.
I previously made a very basic version of this as an example for my book JavaScript Creativity, I had wanted to make it for a long time. This competition was the excuse Ive been looking for to carry on and do something quite interesting with the concept. In some respects the limitations of the competition are quite freeing, because it means I cant get too carried away and there is a deadline!
The Name
Albus.
Despite the obvious Wizarding World connotations (most of my side projects have codenames inspired by JK Rowling), Albus is one of the latin words for White. As white light is the sum of all wavelengths of visible light, I thought it would work well for a colouring app.
Also, it is short, so less bytes!
Planning
I started with pen and paper for this one. Partially because I wanted to write my ideas out just to figure out whether it was even possible to make a progressively enhanced colouring app. Turns out, it is. Even on the oldest of web browsers, you can use the server to generate the line art and print out the image to colour it in with pencils.

As you can see from the photo, I wrote a wish list of things such as drag and drop, a gallery, range of brushes. Below that I wrote a list of must-haves:
- Be usable offline
- Be usable without JS
- Have a default that can be printed
You will note that I wrote be usable, not for one minute did I think that every device and every browser would have the full experience. But I knew that in order for it to work well, and to fit the rules of the competition, it must be usable in all situations. Without JS, without CSS and without a connection.
I wrote range of brush types if possible, I knew that if I had loads of different ideas for brushes then it would not get finished and it would be far too large. Since I had this in mind from the beginning, I was able to write the code in such a way that new brushes can be added over time and can be lazy loaded as they dont need to be loaded before use.
Client Side
I had the basics of the edge detection working with drag and drop from the example I had written for JavaScript Creativity. So I used that as the basis and refactored so that the code was small and still readable. Although the submitted version only has one brush, I knew I wanted multiple brushes to be possible. So to do that I made an interface for brushes that meant any brush would have startPath and mouseMove methods. With those, brushes can easily define their own unique styles. Lots of brushes would use an image rotating, but others could be algorithmic or just totally random.
I also needed to build the interface, I decided to use radio buttons because it meant I could use as little code as possible. To change the colour I decided to simply use an input with type=color so browsers that support it would show a colour picker and others would show a text box where you can enter the colour manually. The alternative (and original idea) is to create a colour picker, while it is easy enough to do this it seemed like a waste of valuable file size and time. The solution is ideal for creating a progressive experience in under 10KB just by using modern features and keeping it simple.
Server
Right, so I have the client-side edge detection working nicely with drag and drop etc. So what do I do now? Ah… yes, we need server-side generation for when JS isnt available.
How?
Well after much research, I realised it is quite awkward trying to do image processing with Node.js. Interestingly, while writing this I have just noticed that not for a second did I consider using a different server side language. At the same time, I already had a working implementation client-side. So it made sense to use that. To do so, I used PhantomJS (thanks to Aaron Gustafson for making me realise Node-Phantom automatically installs PhantomJS). This meant that I was able to create a page purely for edge detection at /edgedetect/ that I could render in Phantom and return to the client. I originally just copy and pasted the code but have since refactored it so that both HTML files use the same edge detection script. An advantage of this, other than being the right way is that in the future difference edge detection algorithms can easily be used.
The limitations for the competition are not required for server-side code but I tried to ensure everything was small anyway. My dependencies (may change) are:
- Handlebars - For templating, mostly just to change the image to using the generated image or an image from gallery.
- Hapi - I usually use Express but often have to use body parser and other small things that Hapi does automatically, so decided to use Hapi.
- Inert - One thing Hapi no longer has is the ability to route to static files, so used Inert for the js and css files.
- Phantom - I have used Phantom to run the edge detection and render it server side.
- Vision - This is used for the Handlebars views.
Service Worker
On my website I am using a service worker that I stole from Jeremy Keith. Since I am not too knowledgable about service workers, I used the same one for Albus. I then modified it and cut out a lot of the code as Albus is generally not going to change content.
After first load, browsers with service workers will now not need to download anything to use Albus. It will also work offline without an issue at all, because all browsers that support service workers can do the client-side edge detection.
Design
Everything I have written about so far is to do with design, how it will work across browsers and the structure of the code. Most people will however think of the visuals. For this project, I worked backwards. Before even thinking about how it was going to look, I needed to prove that it was even possible to make a colouring app in less than 10KB that could do the baseline of edge detection even without JS.
Turns out it is possible, so I started thinking about how it should look and feel. Albus needed to work well on all browsers. My prototype treated small screens as second-rate. So I needed to make sure it works really well on mobile and that the UI is mobile-first. When I started looking at how it should look, with all of the MUST-haves working, the first load was 5.2KB. So I had a bit of room for CSS, and could possibly lazy load icons or something like that.
The most important part of the design is to work well on mobile, so the toolbox is crucial. Instead of the photoshop-style icons on side of screen, I decided to use a modal/dialog box (using the same styling as the splash screen). This means I didnt need to have any icons, so better performance and accessibility. On mobile it now works really well. I think it works nicely on desktop too, but some people may prefer a floating toolbox… that can easily be changed in the future.
I made the decision to use a text only logo instead of a nicely designed one. Partially this is because it is quicker, but thats just an excuse as I could easily lazy load an image or SVG. On the other hand, I am useless at designing logos so went without!
Paper and Crayons
Some browsers dont support canvas or even JS and CSS. So as long as the main edge detection is working, I decided that it makes sense to provide the processed image for download. That way, even in the oldest of browsers, it can be opened with software or printed.
I strongly believe that progressive enhancement benefits everyone, so instead of only showing the download for older browsers I decided to show it for everyone. Most people will use the basic colouring tools, but others now have the ability to easily create line art from a photo then open it in Photoshop if they wish.
Does it fit the rules?
- Size - Yes. The main required files came to just over 10KB without compression. With compression, everything came to just under 7KB.
- Interoperability - Yes. Edge detection, the baseline requirement, works in Lynx. Modern browsers are able to enhance it with modern features.
- Accessibility - Mostly. There can always be improvements with accessibility, and I did run out of time trying to make sure it worked really well. But in general, it is quite accessible.
- Progressive Enhancement - Yes. Progressive enhancement was one of my main aims, to prove it could be done despite the nature of the site.
- Libraries - I have used as few libraries as possible.
Problems and Solutions
Dotted Edge Detection
I found that on a lot of the images I tried, edge detection didn't work very well. To improve the quality I changed the threshold and added a pre-processing blur (thanks to Chris Heilmann for showing me canvass native blur). I lazyload Fabien Loison's StackBlur for browsers that don't support the native blur. I thought I could use a CSS filter but turns out that doesn't show up when you use getImageData for canvas.
Drawing on mobile
In my ultimate wisdom, I forgot how mobiles work. Originally I couldnt get touch working on the canvas, but eventually realised I wasnt actually looking for targetTouches. In the future this could be changed to allow multitouch.
 var clientX = e.clientX || e.targetTouches[0].clientX;
var clientY = e.clientY || e.targetTouches[0].clientY;
Service Worker Re-downloads on install
I noticed that when the service worker adds files to the cache, it downloads the files that have already been downloaded. Jake Archibald said that this can be fixed but I haven't got around to it.
Responsive and Print
Resizing canvas is tricky business. I ran out of time before fixing a bug where the canvas would resize in strange ways. This means that the canvas painting isn't aligned with the base image.
Lynx shows hidden content
I used a checkbox hack to create the open and close buttons for dialogs. Turns out Lynx shows these checkboxes, as there is no way to hide them without CSS or the hidden attribute. So my fix was to add them in with JS, from a template in the html. Not pretty but fixed the issue. For most projects it is probably fine to ignore it.
Drag and Drop causes previous brush strokes to turn to outlines
Another bug I haven't fixed yet is the if you draw on the canvas then drag another image, it will edge detect the brush strokes. Clearing the canvas before edge detection should fix this but didn't seem to when I tried it.
Screenshots